DotNetBrowser is a Chromium-based web view for .NET. It lets you embed modern web content into .NET desktop apps and control it from your code.
Unlike a typical .NET application, an app that runs Chromium depends on system-level components that aren’t part of your project. It might work perfectly on your machine but fail on a clean server or in a CI environment.
Docker solves this by packaging your application together with the exact environment it needs. In this article, you’ll learn how to deploy a DotNetBrowser application using Docker.
Why Docker
DotNetBrowser is built on Chromium, which means it inherits Chromium’s system requirements. On Linux, this includes native libraries and an X server for rendering content. In a typical desktop setup, these pieces are already provided by the operating system. In CI or server environments, they’re often missing.
Docker lets you define and package the environment explicitly. This makes your app more predictable and reduces the classic “it works on my machine” issue. It can also help when you need to run on a Linux distribution outside the officially supported list.
What you’ll need
We’ll build a small .NET application and package it using Docker. To follow along, you’ll need:
- Docker Engine.
- The .NET 8 SDK.
- A DotNetBrowser license.
Creating a DotNetBrowser app
For this example, we’ll work with the following project structure:
Example.Docker/
├── <App files>            # Application source files
├── Dockerfile             # Docker build instructions
└── startup.sh             # Script used to start the app
Let’s start by creating a simple desktop app with Avalonia. To keep things easier, we’ll use the official DotNetBrowser Avalonia template instead of setting everything up from scratch.
First, install the templates:
dotnet new install DotNetBrowser.Templates
Then create a new project:
dotnet new dotnetbrowser.avalonia.app -o Example.Docker -li <your_license_key>
This generates a ready-to-run Avalonia application in the Example.Docker
folder. Out of the box, it opens a window and loads a web page
in DotNetBrowser.
Since the app will run inside a Docker container, we need a simple way to confirm that it works even when no window is visible. We can do that by printing the page title to the console once it loads.
Add the following code to MainWindow.axaml.cs:
// Print the web page's title once the page is loaded.
browser.Navigation.FrameLoadFinished += (_, e) =>
{
    if (e.Frame.IsMain)
    {
        Console.WriteLine($"Title: {browser.Title}");
    }
};

// Load the web page.
browser.Navigation.LoadUrl("https://www.google.com");
With that in place, the application is ready to be packaged. The next step is to produce a Release build:
dotnet publish -c Release -o out
This out/ directory is what the container will use at runtime.
Creating the Dockerfile
Now we need to define the environment where the app will run. In Docker, this
is done using a Dockerfile.
Our goal is to build an image that contains:
- The .NET runtime
- Chromium’s native Linux dependencies
- A virtual display server
- The published application files
Let’s build it step by step.
Basic environment configuration
Start your Dockerfile with the base image:
FROM mcr.microsoft.com/dotnet/runtime:8.0
This image is based on Debian and already includes the .NET runtime, so there’s no need to install it manually.
Keep in mind that Chromium depends on glibc. Because of this, you can’t use
Alpine or any other Linux distribution that relies on musl or a different
standard C library.
Next, set up a non-interactive environment for installing packages:
ENV DEBIAN_FRONTEND=noninteractive
This makes sure apt-get doesn’t pause and ask for input during installation.
Installing Chromium dependencies
Chromium depends on several native Linux libraries. They handle basic system features like windows, graphics, sound, and security. In a minimal Docker image, they aren’t installed by default.
RUN apt-get update && \
    apt-get -y install --no-install-recommends \
        libgtk2.0-0 \
        libgtk-3-0 \
        libgbm1 \
        libnotify4 \
        libgconf-2-4 \
        libnss3 \
        libxss1 \
        libasound2 \
        libxtst6 \
        xauth \
        xvfb \
        x11-xserver-utils && \
    rm -rf /var/lib/apt/lists/*
We also install Xvfb, a lightweight virtual X server that allows DotNetBrowser to run when no physical display is available.
Adding the application
Now that the environment is ready, we can add the application. We need to define how it starts and copy its files into the container.
- Create a startup script.
Instead of launching the app directly, we’ll use a small wrapper script:
#!/bin/sh

set -e

if [ -z "${DISPLAY:-}" ]; then
  Xvfb :0 -screen 0 1920x1080x24 &
  export DISPLAY=:0
fi

exec dotnet Example.Docker.dll
This script checks whether an X server is available via the DISPLAY variable:
- If
DISPLAYis not set, it starts a virtual display and points the app to it. - If
DISPLAYis set, it assumes a real X server is available and runs normally.
Even though the display is virtual, Chromium treats it like a real screen. So
we set the resolution and color depth using the -screen option.
- Copy the script into the image:
WORKDIR /Example.Docker

COPY startup.sh .
RUN chmod +x startup.sh
We set a working directory, copy the script, and make it executable.
- Copy the previously published application files:
COPY out/ .
- Define the entry point:
ENTRYPOINT ["/Example.Docker/startup.sh"]
This tells Docker what to execute when the container starts.
At this point, the Docker image is ready. The next step is to build it and see it run.
Building and running the container
Make sure the Docker Engine is running, then build the image:
docker build -t dnb-app -f Dockerfile .
There are two common ways to run the container:
- Headless mode — useful for automation, tests, and server-side runs where no UI is needed.
- Desktop mode — useful when you want to see the application window and debug visually.
Here’s how each mode works.
Headless mode
Headless mode is the most common setup in CI or server environments. In this mode, the application runs with a virtual X server instead of a real display.
Run the container:
docker run --rm --shm-size=1g dnb-app
Since DISPLAY isn’t set, the startup script launches Xvfb and runs
the application in headless mode.
The --shm-size=1g option increases the amount of shared memory available to
the container. Chromium uses shared memory for communication between its
processes. On most Linux systems, it’s large enough by default. In Docker, it’s
limited to 64 MB — far too small for Chromium.
In the sample application, we load Google and print the page title. When the container starts, you should see this:
Title: Google
Desktop mode
Desktop mode is useful when you want to see the application window from inside the container — for example, to debug rendering issues or test user input. In this case, the container needs access to your host’s X server.
This approach works on Linux systems that use X11. On Linux, graphical apps
communicate with the X server through a Unix socket, and the DISPLAY variable
tells them which display to use. We pass this information to the container so
the app can show its window on your host desktop.
First, allow local connections to your X server:
xhost +local:root
Then start the container:
docker run --rm \
  --shm-size=1g \
  -e DISPLAY=$DISPLAY \
  -v /tmp/.X11-unix:/tmp/.X11-unix \
  dnb-app
Here’s what’s happening:
-e DISPLAY=$DISPLAYtells the application which display to use.-v /tmp/.X11-unix:/tmp/.X11-unixmounts the X11 communication socket.
The application window should appear:
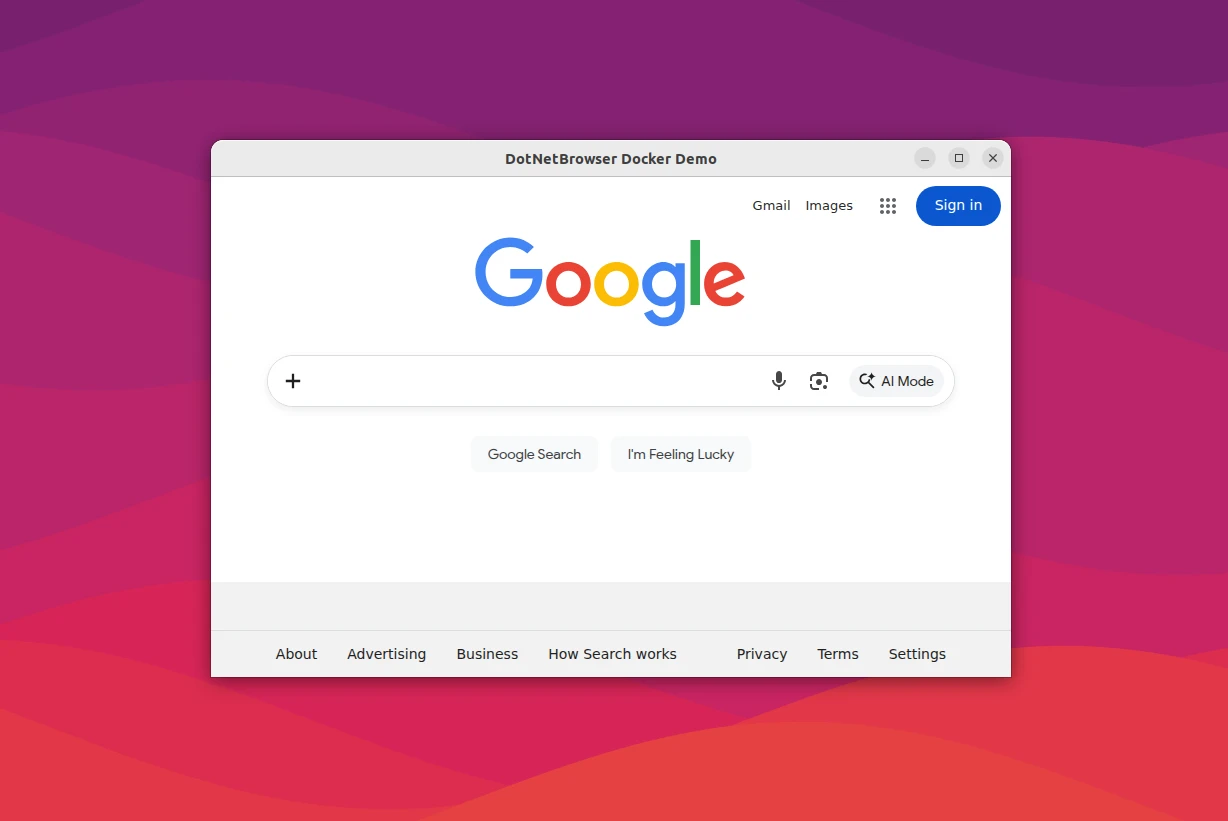
The app window rendered by the container.
When you’re done, you can revoke the X server permission:
xhost -local:root
The complete example application is available in the GitHub repository.
Remote debugging
When something breaks, you need to see what’s happening inside Chromium — inspect the DOM, debug JavaScript, or monitor network requests.
In DotNetBrowser, remote debugging is enabled through engine options: you set
the port and add the --remote-allow-origins switch.
Add the following configuration to EngineOptions.Builder:
IEngine engine = EngineFactory.Create(new EngineOptions.Builder
{
    ChromiumSwitches = { "--remote-allow-origins=http://localhost:9222" },
    RemoteDebuggingPort = 9222
}.Build());
Don’t forget to rebuild the Docker image after modifying the application.
When Chromium runs inside a container, DevTools aren’t directly accessible from your host. Chromium exposes DevTools on a local port — but “local” means inside the container. To access DevTools from the host machine, use SSH local port forwarding.
On the host, start the container and publish the SSH port:
docker run -d -p 2222:22 --shm-size=1g dnb-app
Open a shell inside the running container:
docker exec -it <container_id> /bin/bash
Replace <container_id> with the ID of the running container. You can find it
by running docker ps.
Install and start the SSH server inside the container:
apt install -y openssh-server
service ssh start
Inside the container, create a user for SSH access:
useradd --create-home --shell /bin/bash dnb-app
passwd dnb-app
On the host, forward the remote debugging port:
ssh -L 9222:localhost:9222 -p 2222 dnb-app@localhost
This command creates a tunnel from localhost:9222 on the host to
localhost:9222 inside the container. Keep this SSH session open while you use
DevTools.
On the host, open Google Chrome and load chrome://inspect to access
the DevTools.
Summary
A DotNetBrowser application isn’t just a .NET process — it embeds a full Chromium engine. That engine expects specific system libraries and a display server. Docker lets you define that environment explicitly and run the same image locally, in CI, or in production with consistent results.
Sending…
Sorry, the sending was interrupted
Please try again. If the issue persists, contact us at info@teamdev.com.
Your personal DotNetBrowser trial key and quick start guide will arrive in your Email Inbox in a few minutes.