AI features often rely on cloud services. This works well in many cases, but it isn’t always necessary. For some tasks, running a model locally can be a better alternative, especially when privacy, offline access, or predictable latency are important.
Modern web technologies already make it possible to run AI models locally. A browser can download a model, cache it, and perform inference using the CPU or GPU.
Many desktop applications embed a browser engine using a component called a web view. Since it relies on the same technology as a regular browser, it can also download and run AI models locally inside a native window.
In this article, we’ll build a .NET desktop application that runs a local AI model directly on the user’s machine using DotNetBrowser and Transformers.js.
When local AI fits
This approach works best for small AI features that benefit from staying close to the user and do not require the overhead of large models.
It has a few practical benefits:
- Better privacy, because prompts and outputs can stay on the device.
- Offline or partially offline use after the model assets are downloaded.
- Lower backend cost, because the app does not depend on hosted inference.
- More control over model choice and optimization for specific tasks.
It also comes with tradeoffs:
- Local AI in the browser usually uses smaller models, which can limit reasoning and accuracy on complex tasks.
- Performance that depends heavily on the user’s hardware.
- A large first download, and more memory use for larger models.
The app structure
To demonstrate the approach, we’ll build a simple writing assistant. The application lets users paste text into a textarea and transform it.
It supports three actions: summarize the text, shorten it, or rephrase it. Once the user enters text and chooses an action, the app sends the request to the local model and shows the result below the input field.
Under the hood, the app relies on three main components:
- Avalonia UI creates the native desktop shell and hosts the embedded browser.
- DotNetBrowser embeds a Chromium engine inside that window and loads the web interface.
- Transformers.js runs the local AI model inside the embedded browser page.
Here is how the components fit together:
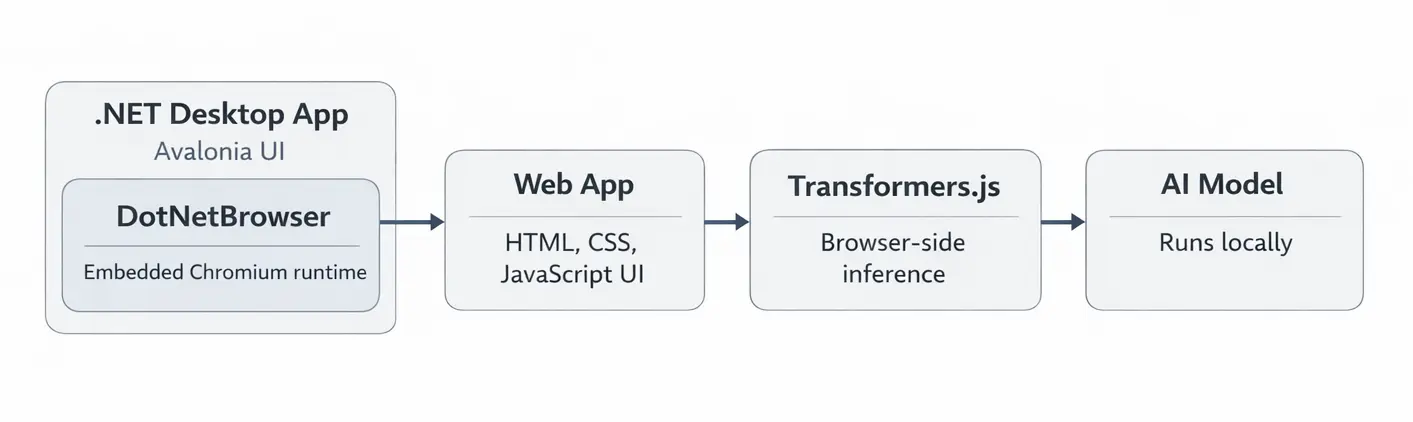
Application architecture.
Setting up the desktop host
We’ll start by creating a .NET host application that will display the web UI. For the desktop shell, we use Avalonia to create the native window and layout, and embed the web UI into it using DotNetBrowser.
To simplify the setup, we can use the official DotNetBrowser Avalonia template. It already includes the basic project structure and browser initialization.
First, install the templates:
dotnet new install DotNetBrowser.Templates
Then create a new project:
dotnet new dotnetbrowser.avalonia.app -o local-llm-assistant -li <your_license_key>
This command creates a ready-to-run Avalonia application. By default, the app opens a window and loads a web page inside DotNetBrowser.
Instead of loading an external page, we’ll configure it to serve our own web UI
and JavaScript code. To do that, we’ll use a
custom URI scheme, which allows the browser to
load web application files using a custom URL such as dnb://app/.
Add the following scheme handler implementation:
internal sealed class LocalAppSchemeHandler
    : IHandler<InterceptRequestParameters, InterceptRequestResponse>
{
    public const string Domain = "dnb://app/";
    public static readonly Scheme Scheme = Scheme.Create("dnb");

    public InterceptRequestResponse Handle(InterceptRequestParameters parameters)
    {
        string relativePath = GetRelativePath(parameters.UrlRequest.Url);
        string fullPath = Path.Combine(AppContext.BaseDirectory, "web", relativePath);

        UrlRequestJob job = parameters.Network.CreateUrlRequestJob(
            parameters.UrlRequest,
            new UrlRequestJobOptions
            {
                HttpStatusCode = HttpStatusCode.OK,
                Headers = new List<HttpHeader>
                {
                    new HttpHeader("Content-Type", GetMimeType(fullPath).Value)
                }
            });

        job.Write(File.ReadAllBytes(fullPath));
        job.Complete();
        return InterceptRequestResponse.Intercept(job);
    }
}
And register the scheme when creating the engine in MainWindow.axaml.cs:
EngineOptions engineOptions = new EngineOptions.Builder
{
    LicenseKey = "<your_license_key>",
    RenderingMode = RenderingMode.HardwareAccelerated,
    Schemes =
    {
        { LocalAppSchemeHandler.Scheme, new LocalAppSchemeHandler() }
    }
}.Build();

browser.Navigation.LoadUrl(LocalAppSchemeHandler.Domain);
When the browser loads dnb://app/, the handler maps that URL to files in
the web/ directory and returns their contents. This way, the browser can
load the web application from the app’s bundled files without requiring
a separate web server.
Creating the web UI
Now we can build the web UI that DotNetBrowser will load.
Create a web/index.html file and add the following minimal page:
<body>
<main class="app">
  <h1>Local Writer Assistant</h1>
  <textarea id="input" placeholder="Paste text here"></textarea>

  <div class="actions">
    <button data-action="summarize">Summarize</button>
    <button data-action="shorten">Shorten</button>
    <button data-action="rephrase">Rephrase</button>
  </div>

  <pre id="output">Model output will appear here.</pre>
</main>

<script type="module" src="./app.js"></script>
</body>
This gives us a textarea for input, three action buttons, and a panel where
the generated result will appear. The rest of the browser-side logic will
live in app.js.
Running a local model
Transformers.js provides a high-level pipeline() API for loading a model and
running inference for a specific task. In this example, we use
a text2text-generation task, which takes input text and produces
a transformed version, making it a good fit for this writing assistant app.
We also use the Xenova/LaMini-Flan-T5-783M model because it is small
enough to run locally while still producing reasonable results.
For simplicity, this example uses vanilla JavaScript, but the same approach works with any web UI framework.
Create a web/app.js file to load the AI model:
import { pipeline } from "https://cdn.jsdelivr.net/npm/@huggingface/transformers@3.8.1";

const MODEL_ID = "Xenova/LaMini-Flan-T5-783M";

async function createGenerator() {
  if (navigator.gpu) {
    try {
      return await pipeline("text2text-generation", MODEL_ID, {
        device: "webgpu",
        dtype: "q4",
      });
    } catch (error) {
      console.warn("WebGPU initialization failed, falling back.", error);
    }
  }
  return await pipeline("text2text-generation", MODEL_ID, {
    dtype: "q4",
  });
}
In the code above, we pass device: "webgpu" to the pipeline to enable GPU
acceleration. Transformers.js uses this option to access the WebGPU API. This
allows model computations to run on the GPU instead of the CPU, which can
significantly improve performance.
DotNetBrowser supports WebGPU in its embedded Chromium engine, so the model can use GPU acceleration when the system supports it.
Connecting UI actions to the model
Next, we need to connect the three actions to the model so each button runs a different text transformation.
In the same app.js file, add the following code:
const input = document.querySelector("#input");
const output = document.querySelector("#output");
const buttons = document.querySelectorAll("button[data-action]");

const generator = await createGenerator();

const prompts = {
  summarize: (text) => `Summarize this text in 3 bullet points: ${text}`,
  shorten: (text) => `Shorten this text while preserving the meaning: ${text}`,
  rephrase: (text) => `Rephrase this text in clearer language: ${text}`,
};

for (const button of buttons) {
  button.addEventListener("click", async () => {
    const action = button.dataset.action;
    const prompt = prompts[action](input.value.trim());

    const result = await generator(prompt, {
      max_new_tokens: 128,
      temperature: 0.2,
      do_sample: false,
    });

    output.textContent = result[0].generated_text;
  });
}
When the user clicks a button, the application reads the input text, builds the corresponding prompt, and sends it to the model. The generated output is then displayed in the UI.
Running the application
From the project directory, run:
dotnet run
When the window opens, paste some text into the input field and click one of the actions. The app runs the model locally and shows the generated result in the same window.
With some light styling, the app looks like this:
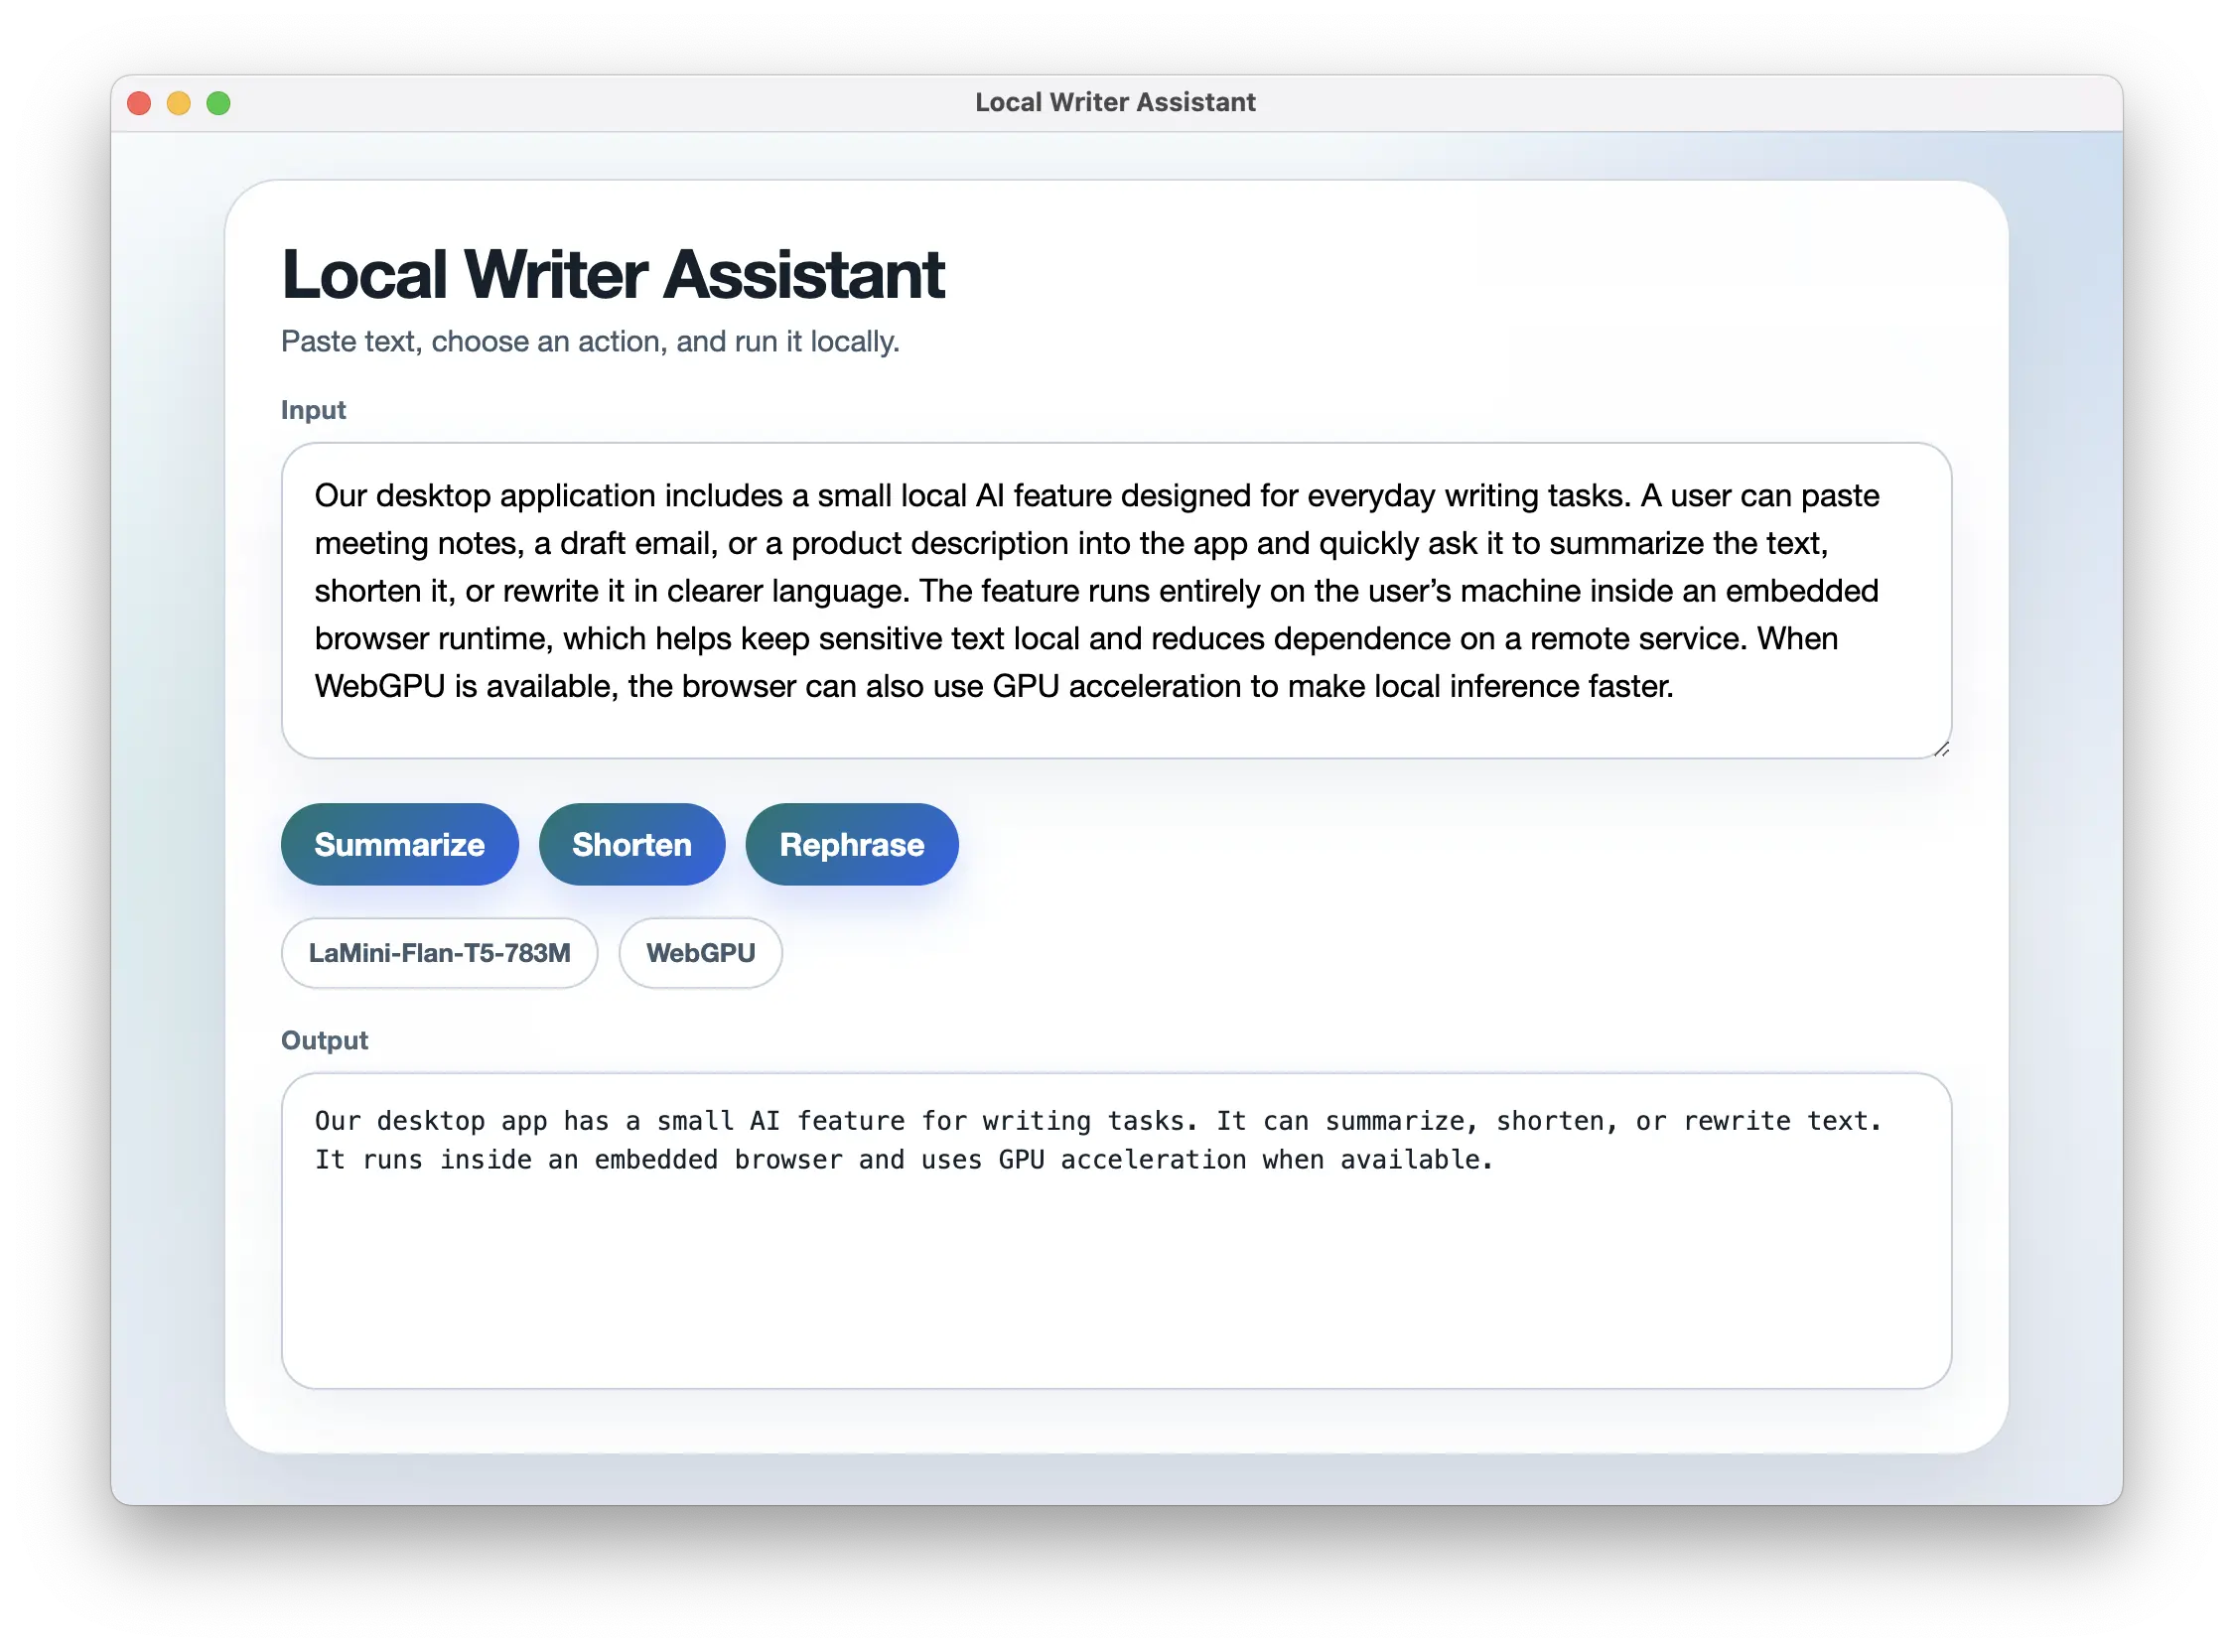
The local AI model running inside a .NET desktop window.
You can find the complete example in the GitHub repository.
Summary
In this tutorial, we built a small desktop writing assistant with Avalonia, DotNetBrowser, and Transformers.js. The app loads a web UI inside a .NET window and uses a local model to transform text.
This is a practical way to add small AI features to a desktop app when you want to keep processing on the device. It is especially useful for features where privacy, offline access, or predictable response times matter.
Sending…
Sorry, the sending was interrupted
Please try again. If the issue persists, contact us at info@teamdev.com.
Your personal DotNetBrowser trial key and quick start guide will arrive in your Email Inbox in a few minutes.