This guide describes how to deploy JxBrowser within your Java application via Java Web Start, Java Applet, or as a regular Java desktop application.
Java Desktop Application
JxBrowser can be deployed with your software distribution like any other standard Java library. All you need to do is to include required JxBrowser JAR files and the license file into your application class path. For example, you must include the following JAR files into your cross-platform Java application class path:
jxbrowser.jar
license.jar
jxbrowser-win32.jar
jxbrowser-win64.jar
jxbrowser-mac.jar
jxbrowser-linux64.jar
If your application supports only Windows platform, there is no need to include the jxbrowser-mac.jar, and jxbrowser-linux64.jar JAR files into your application class path.
Java Web Start
This section describes how you can deploy your Java application with JxBrowser library via Java Web Start (JWS). To deploy your application via JWS, please follow the following steps:
Pack your application classes into an application JAR file(s). For example myapp.jar.
Sign all JAR files used in your application (including all JxBrowser JARs and the license JAR file) with a valid signature. To sign JAR files you can use the jarsigner tool. For example.
jarsigner -keystore keystore_file -storepass storepass
    -keypass keypass myapp.jar alias
Make sure that you replace keystore_file, storepass, keypass, and alias with your own values.
JxBrowser JAR files are not signed, so you need to sign them with the same signature you use for signing your application JAR files.
Create and configure your application JNLP file (e.g. myapp.jnlp) as described below:
<jnlp spec="1.6+" codebase="my_url" href="myapp.jnlp">
    <information>
        <title>My Application</title>
        <vendor>My Company</vendor>
        <description>My Application Description</description>
        <offline-allowed/>
    </information>

    <security>
        <all-permissions/>
    </security>

    <resources>
        <j2se version="1.6+"/>
        <jar href="lib/myapp.jar"/>
        <jar href="lib/jxbrowser.jar" />
        <jar href="lib/license.jar" />
    </resources>

    <resources os="Windows">
        <jar href="lib/jxbrowser-win32.jar" />
        <jar href="lib/jxbrowser-win64.jar" />
    </resources>

    <resources os="Mac OS X">
        <jar href="lib/jxbrowser-mac.jar" />
    </resources>

    <resources os="Linux" arch="x86_64 amd64">
        <jar href="lib/jxbrowser-linux64.jar" />
    </resources>
</jnlp>
Make sure that you replace the codebase attribute value with a valid URL address of your web server where JAR files will be located.
Depending on the network speed it might take some time to download all JxBrowser JAR files. To speed up start up time of your Java Web Start application you might want to use the download="lazy" attribute of the jar element.
Upload all signed JAR files and the myapp.jnlp file to a web-server.
Java 9 and higher
On Java 9, Java Web start sets the --illegal-access=deny VM parameter by default. However, in order to work correctly, your Java Web start application should be run with the --illegal-access=permit VM parameter. Otherwise you will be getting the IllegalAccessError. This is a known limitation, as JxBrowser support Java 9 with some limitations (more details here ).
Unfortunately, Java Web Start does not support the --illegal-access=permit VM parameter. JNLP applications that need to break encapsulation should use the precise options, like --add-exports and --add-opens.
The solution is adding the following line to your JNLP file:
java-vm-args="--add-opens=java.base/java.util=ALL-UNNAMED--add-exports=java.desktop/sun.awt=ALL-UNNAMED
Java Applet
You can use JxBrowser in Java Applet the same way as a standard Java library.
JxBrowser requires access to file system, so all the JAR libraries of your Java Applet must be signed. JxBrowser JAR files are signed with TeamDev signature by default, so you don’t need to to sign them.
Your APPLET tag on a web page should look like:
<APPLET code="com.mycompany.myapp.Application.class" codebase="."
    archive="myapp.jar, jxbrowser.jar,jxbrowser-win32.jar,
        jxbrowser-win64.jar,jxbrowser-mac.jar,
        jxbrowser-linux64.jar" WIDTH=800 HEIGHT=400>
    Browser doesn't support Java Applets.
</APPLET>
Where the myapp.jar file is your application JAR file.
OSGi
JxBrowser can be used in OSGi environment. There are 4 popular OSGi specification implementations:
- Felix
- Eclipse
- Knopflerfish
- ProSyst
JxBrowser supports the following implementations:
- Felix
- Eclipse
Each JxBrowser JAR file represents an OSGi bundle. You need to include the required JxBrowser OSGi bundles (JAR files) into your OSGi application. The license.jar file that contains JxBrowser license isn’t an OSGi bundle, so we recommend that you extract the teamdev.licenses file from the license.jar archive and put it into the META-INF folder of the jxbrowser.jar file, so that license checker could find it.
Citrix
JxBrowser can be used in Citrix environment if it’s configured in appropriate way. The following instruction describes how Citrix environment should be configured to be able to run JxBrowser Demo application.
Using the approach described below you can configure Citrix to run any Java application based on JxBrowser library.
Preconditions
- Download and install VirtualBox.
- Download and install Windows Server 2012 on VirtualBox’s VM (VM#1). Make sure that you use the Host Only network with no DHCP VM setting.
- Set static IP for installed VM#1.
- Add following server roles:
- Active Directory Domain Services
- DNS Server
- Configure Active Directory and DNS following to wizard’s instructions. Setup SSL according to the instruction:
http://xenappblog.com/2015/securing-citrix-x1-storefront-with-powershell/. - Install second VM with downloaded Windows Server 2012 (VM#2). Make sure that you use the Host Only network on the same controller as VM#1 VM setting.
- Set static IP for installed VM#2 in the same sub-network as VM#1.
- Join VM#2 to Active Directory located on VM#1.
- Import SSL certificate from VM#1.
XenDesktop Setup
- Download Citrix XenDesktop.
- Install XenDesktop on VM#2. Note: it won’t install on domain controller.
- Install Delivery Controller.
- Configure the XenDesktop.
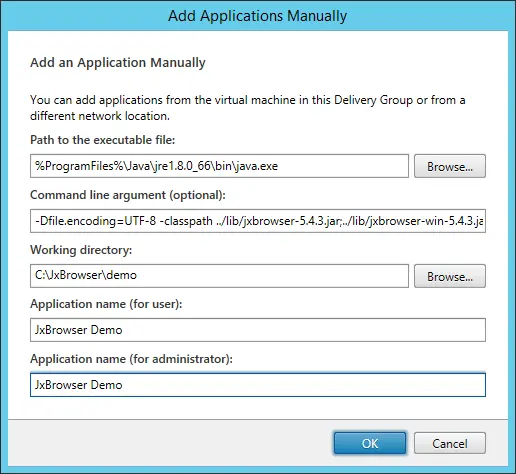
- Add VM#2 into new Delivery Group and manually add Application as shown below:

- Important: Do not configure StoreWeb yet!
- Install and configure Virtual Delivery Agent for Windows Server OS. After setup: change StoreWeb base URL to use HTTPS.
Test Configuration
- Install Citrix Receiver on VM#1. Install CitrixReceiver.exe. Connect to VM#2 using IE and allow installation of CitrixReceiver.exe.
- Ensure application could be started in Browser and close browser.
- Open Citrix Receiver, enter server name as vm1.domain.local and ensure that application could be started in Citrix Receiver client.