DOM
This guide describes how to access a DOM document, find elements, modify a DOM structure, simulate user input, etc.
Overview
Each web page loaded in
a Browser
has a main Frame
. The Frame
itself may have child frames. For example, when a web page has IFRAMEs, please use
the Frame class
to access DOM and JavaScript.
Accessing document
Every Frame has
a DOM Document. To access the Document please use the Frame.document() method:
frame.document().ifPresent(document -> {
});
val document = frame.document
document?.let {
}
Finding elements
You can find HTML elements inside an element by different conditions. The following example demonstrates how to find
all DIV elements inside the document element:
document.documentElement().ifPresent(documentElement ->
        documentElement.findElementsByTagName("div")
                .forEach(element -> {
                    // ...
                })
);
val divs = document.documentElement!!.findElementsByTagName("div")
divs.forEach { element -> }
If you need to find only the first HTML element use the following approach:
documentElement.findElementByTagName("div").ifPresent(element -> {
});
val div = documentElement.findByTagName("div")
div?.let {
}
Here are the examples of searching for HTML elements by different conditions:
documentElement.findElementsById("<id>");
documentElement.findElementsByName("<attr-name>");
documentElement.findElementsByTagName("<tag-name>");
documentElement.findElementsByClassName("<attr-class>");
documentElement.findElementsById("<id>")
documentElement.findElementsByName("<attr-name>")
documentElement.findElementsByTagName("<tag-name>")
documentElement.findElementsByClassName("<attr-class>")
XPath
JxBrowser DOM API allows evaluating XPath expressions using Node.evaluate(String expression). You can evaluate an
XPath expression in scope of a specified Node using the following code:
try {
    var result = node.evaluate("count(//div)");
} catch (XPathException e) {
    // Failed to evaluate the given expression.
}
val queryNumberOfDivs = XPathExpression("count(//div)")
try {
    val result: XPathResult = node.evaluate(queryNumberOfDivs)
} catch (e: XPathException) {
    // Failed to evaluate the given expression.
}
The method throws XPathException when the library failed to evaluate the given expression.
The evaluation result is stored in the XPathResult object. Please make sure that the result contains the expected
value type, e.g. Number, Boolean, String, Node, and extracts the value itself:
if (result.isNumber()) {
    double number = result.asNumber();
}
if (result.isNumber) {
    val number: Double = result.asNumber()
}
Query selector
To find the elements that match a specified selector, e.g. #root, please use the following code:
var elements = element.findElementsByCssSelector("#root");
val elements = element.findElementsByCssSelector("#root")
Node at point
To find the Node at a specific point, e.g. 100x150, on the web page please use the following approach:
var inspection = frame.inspect(Point.of(100, 150));
inspection.node().ifPresent(node -> {});
val inspection: PointInspection = frame.inspect(Point(100, 150))
val node: Node? = inspection.node
Shadow DOM
If an element has an open shadow root, it can be accessed through JavaScript. Because every DOM object is also a
JavaScript object, you can cast an Element to JsObject and read its shadowRoot property.
documentElement.findElementById("container").ifPresent(element -> {
    var jsObject = (JsObject) element;
    jsObject.property("shadowRoot").ifPresent(root -> {
        Node rootNode = (Node) root;
        for (Node child : rootNode.children()) {
            // ...
        }
    });
});
val container = documentElement.findById("container") as JsObject
container.property<Node>("shadowRoot").ifPresent { rootNode ->
    for (child in rootNode.children()) {
        // ...
    }
}
Working with elements
Element bounds
You can get bounds of the Element with the position relative to the top-left of the viewport of the current Document
as follows:
var rect = element.boundingClientRect();
val rect = element.boundingClientRect()
This method returns an empty Rect when the element has a hidden attribute or the CSS style of the element contains display: none; statement.
Element attributes
The Element class provides methods that allow you to get, add, remove, or modify the HTML element attributes. The
following example demonstrates how to get all the attributes of the element and print their names and values:
element.attributes().asMap().forEach((name, value) ->
        System.out.println(name + ": " + value));
element.attributes.asMap().forEach { (name, value) ->
    println("$name: $value")
}
The following example demonstrates how to add/modify an element attribute:
element.attributes().put("attrName", "attrValue");
element.attributes["attrName"] = "attrValue"
Element content
The Element class provides method that allow you to get or modify the content of the element. These methods map
directly to the corresponding attributes in the JavaScript’s HTMLElement:
// Get the value of the innerHTML attribute.
var innerHtml = element.innerHtml();
// Set the value to the innerHTML attribute.
element.innerHtml("<span>New inner HTML<span>");

// Get the value of the outerHTML attribute.
var outerHtml = element.outerHtml();
// Set the value to the outerHTML attribute.
element.outerHtml("<div><p>New outer HTML</p></div>");

// Get the value of the textContent attribute.
var textContent = element.textContent();
// Set the value to the textContent attribute.
element.textContent("New text content");

// Get the value of the innerText attribute.
var innerText = element.innerText();
// Set the value to the innerText attribute.
element.innerText("New inner text");
// Get the value of the innerHTML attribute.
val innerHtml = element.innerHtml
// Set the value to the innerHTML attribute.
element.innerHtml("<span>New inner HTML<span>")

// Get the value of the outerHTML attribute.
val outerHtml = element.outerHtml
// Set the value to the outerHTML attribute.
element.outerHtml("<div><p>New outer HTML</p></div>")

// Get the value of the textContent attribute.
val textContent = element.textContent()
// Set the value to the textContent attribute.
element.textContent("New text content")

// Get the value of the innerText attribute.
val innerText = element.innerText
// Set the value to the innerText attribute.
element.innerText("New inner text")
Focusing elements
If the browser is focused and an element is focusable, you can set focus to that element.
element.focus();
element.focus()
Calling the focus() method will not scroll the focused element into the view. But you can do it manually:
element.scrollIntoView(AlignTo.TOP);
element.scrollIntoView(AlignTo.TOP)
Respectively, you can remove the focus from the element using blur():
element.blur();
element.blur()
Creating elements
The DOM API allows modifying the document DOM structure. The following example demonstrates how to create and
insert <p> element with some text:
// Create a new paragraph element.
var paragraph = document.createElement("p");
// Create a text node with the given text.
var text = document.createTextNode("Text");
// Insert the text node into the paragraph element.
if (paragraph.appendChild(text)) {
    // Insert the paragraph element into the required element.
    boolean success = element.appendChild(paragraph);
}
// Create a new paragraph element.
val paragraph = document.createElement("p")
// Create a text node with the given text.
val text = document.createTextNode("Text")
// Insert the text node into the paragraph element.
if (paragraph.appendChild(text)) {
    // Insert the paragraph element into the required element.
    val success = element.appendChild(paragraph)
}
Closing nodes
DOM objects that have a Node counterpart are not a subject to Blink garbage collection. By default, we keep these
objects in memory until the page is unloaded.
To optimize the memory usage, you can enable garbage collection on the per-object basis:
node.close();
node.close()
Closing Node marks the corresponding Blink object as collectable, but it does not release the object immediately.
After calling the close() method, the attempts to use Node will lead to ObjectClosedException.
DOM events
Each Node implements the EventTarget interface that provides methods for registering DOM events. You can register
DOM listener to receive DOM events such as click, mousedown, mouseup, keydown, load, error etc.
The following example demonstrates how to register a click event listener for a document HTML element:
document.documentElement().ifPresent(element ->
        element.addEventListener(EventType.CLICK, event -> {
            // Mouse click event has been received.
            if (event instanceof MouseEvent) {
                var mouseEvent = (MouseEvent) event;
                var clickCount = mouseEvent.clickCount();
            }
        }, false)
);
val listener = Observer<Event> { event ->
    // Mouse click event has been received.
    if (event is MouseEvent) {
        val clickCount = event.clickCount()
    }
}
val useCapture = false
document.documentElement?.addEventListener(
    EventType.CLICK,
    listener,
    useCapture
)
Also, JxBrowser allows you to listen to the custom DOM events and access their payload:
// Create a custom DOM event type.
var eventType = EventType.of("MyEvent");
// Listen to the events of the given event type.
element.addEventListener(eventType, event -> {
    // The MyEvent event has been received.
    if (event instanceof CustomEvent) {
        var customEvent = (CustomEvent) event;
        var payload = customEvent.detail();
    }
}, false);
// Create a custom DOM event type.
val eventType = EventType.of("MyEvent")
val listener = Observer<Event> { event ->
    // The MyEvent event has been received.
    if (event is CustomEvent) {
        val payload = event.detail<JsObject>()
    }
}
val useCapture = false
// Listen to the events of the given event type.
element.addEventListener(eventType, listener, useCapture)
Automation
JxBrowser DOM API provides everything you need to automate the web form filling. This section describes how to work with forms, update the text in the text fields, select a checkbox or a radio button, select one or multiple options in a drop-down list, simulate a click, etc.
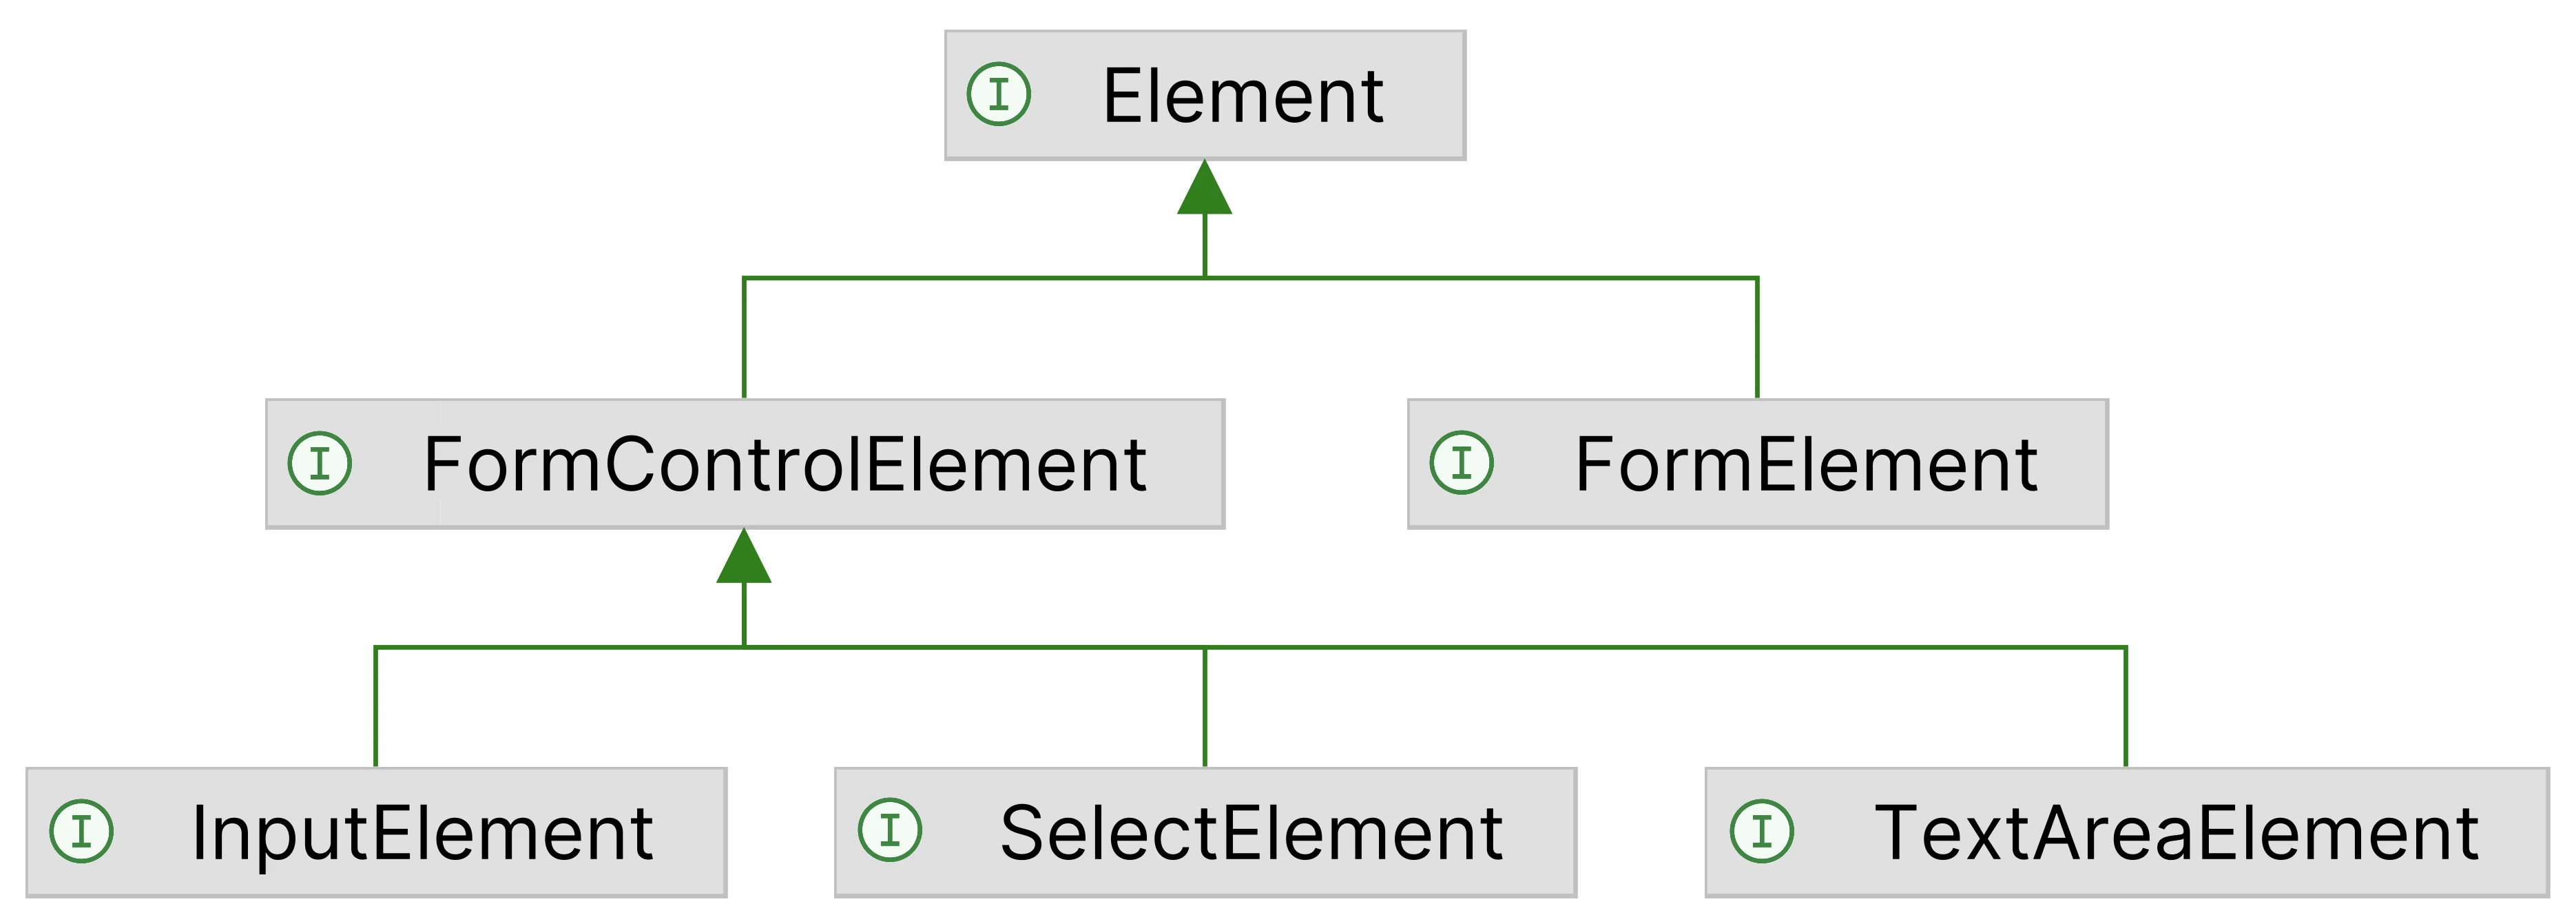
When working with forms and form controls, you can cast instances of Element down to a more specific type.
For example, the <form> elements are instances of the FormElement type, and the controls are subtypes of
FormControlElement.
Dispatching synthetic DOM events may not be a reliable way to simulate the user input.
If you need to simulate mouse, keyboard, or touch input, use the special kind of events dispatched
through the Browser object.
Form
With the FormElement interface, you can read form attributes, get the list of controls, submit or reset the form:
documentElement.findElementById("my-form").ifPresent(element -> {
    var form = (FormElement) element;

    // Attributes:
    var name = form.name();
    var method = form.method();
    var action = form.action();

    // Actions:
    form.submit();
    form.reset();

    // Controls:
    List<FormControlElement> controls = form.controls();
});
val form = documentElement.findById("my-form") as FormElement
// Attributes:
val name = form.name()
val method = form.method()
val action = form.action()

// Actions:
form.submit()
form.reset()

// Controls:
val controls: List<FormControlElement> = form.controls()
Input
The <input> elements are instances of InputElement interface, which provides all the required methods to check the
input type, and read or set its value.
Text, email, password
To set the value of a text, email, or password field, please use the InputElement.value(String) method:
documentElement.findElementById("firstname").ifPresent(element -> {
    var input = (InputElement) element;
    input.value("John");
});
val firstname = documentElement.findById("firstname") as InputElement
firstname.value = "John"
Check box, radio button
To check a radio button or a checkbox please use the InputElement.check() method:
documentElement.findElementById("checkbox").ifPresent(element -> {
    var checkbox = (InputElement) element;
    checkbox.check();
});

documentElement.findElementById("radio").ifPresent(element -> {
    var radio = (InputElement) element;
    radio.uncheck();
});
val checkbox = documentElement.getById("checkbox") as InputElement
checkbox.check()

val radio = documentElement.getById("radio") as InputElement
radio.uncheck()
File
The <input> elements with type=file let the user choose one or more files from their device storage. JxBrowser
allows you to programmatically select a file and update the value of the <input type=file> elements.
For example, if your web form contains an <input> element like:
<input type="file" id="avatar" accept="image/png, image/jpeg" multiple>
you can select the required file/files programmatically using the following approach:
documentElement.findElementById("avatar").ifPresent(element -> {
    var input = (InputElement) element;
    input.file("file1.png", "file2.jpeg");
});
val avatar = documentElement.getById("avatar") as InputElement
avatar.file("file1.png", "file2.png")
Text area
To set the text in a <textarea> element like:
<textarea id="details"></textarea>
please use the following approach:
documentElement.findElementById("details").ifPresent(element -> {
    var textarea = (TextAreaElement) element;
    textarea.value("Some text...");
});
val details = documentElement.getById("details") as TextAreaElement
details.value = "Some text..."
Select & option
To select all options in a SELECT control like:
<select id="fruits" multiple>
    <option>Apple</option>
    <option>Orange</option>
    <option>Pineapple</option>
    <option>Banana</option>
</select>
please use the following approach:
documentElement.findElementById("fruits").ifPresent(element -> {
    var selectElement = (SelectElement) element;
    selectElement.options().forEach(optionElement ->
            optionElement.select()
    );
});
val fruits = documentElement.getById("fruits") as SelectElement
fruits.options.forEach {
    it.select()
}
Using this approach you can select only one required option.
Simulating click
To simulate a mouse click on an element please use the following method:
element.click();
element.click()
When click() is used with the supported elements (such as an <input>), it fires the element’s click event. This
event then bubbles up to the elements higher in the document tree and fires their click events.
Dispatching synthetic events
You can dispatch an Event at the specified EventTarget using the EventTarget.dispatch(Event) method.
The following example demonstrates how to dispatch a standard click event at the specified element:
// Client and screen location.
var location = Point.of(10, 10);
// Create MouseEvent with the required options.
var mouseClickEvent = document.createMouseEvent(EventType.CLICK,
        MouseEventParams.newBuilder()
                // The main button pressed.
                .button(MouseEvent.Button.MAIN)
                .clientLocation(location)
                .screenLocation(location)
                .uiEventModifierParams(
                        UiEventModifierParams.newBuilder()
                                .eventParams(EventParams.newBuilder()
                                        .bubbles(true)
                                        .cancelable(true)
                                        .build()
                                ).build()
                ).build()
);
// Generate a click event on the target element.
element.dispatch(mouseClickEvent);
// Client and screen location.
val location = Point(10, 10)
// Create MouseEvent with the required options.
val eventParams = EventParams(bubbles = true, cancelable = true)
val uiEventModifiers = UiEventModifierParams(eventParams)
val mouseEventParams = MouseEventParams(
    button = MouseEvent.Button.MAIN, // The main button pressed.
    location = location,
    locationOnScreen = location,
    uiEventModifierParams = uiEventModifiers
)
val mouseClickEvent = document.createMouseEvent(
    EventType.CLICK,
    mouseEventParams
)
// Generate a click event on the target element.
element.dispatch(mouseClickEvent)
Using this approach you can create and dispatch various DOM events. Such events are commonly called synthetic events
, as opposed to the events fired by the Browser itself.