Automatic Updates
Check for, download, and install updates automatically.
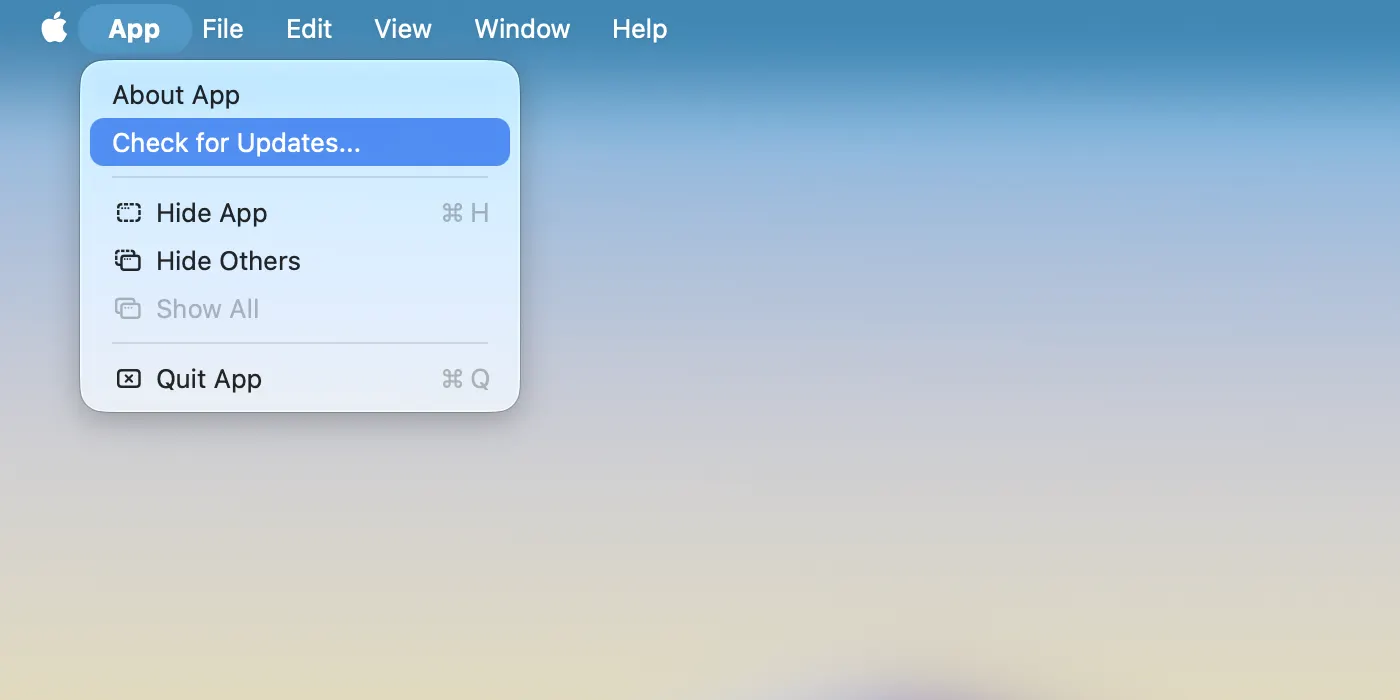
MōBrowser provides a built-in mechanism to check for updates, download the latest version of your application, and install it. This feature is useful when you want to distribute updates to your users without them having to manually download and install the new version of your application.
Enabling automatic updates in your application consists of several steps including:
- Configuring an update server.
- Adding update functionality to your application.
- Building the application and generating the update files.
- Uploading the update files to the update server.
- Securing your updates so that only you can publish them.
More details about each step are provided in the sections below.
Note: On Windows, the application can be auto-updated only if it’s installed using the native installer generated by MōBrowser. If you distribute your application in any other way (e.g., by manually copying the executable files or as a ZIP archive), the auto-update functionality will not work.
Configuring an update server
First, you need to set up an update server that will host the new versions of your application. The update server is an HTTPS server that hosts the files and allows your application to download them using a direct link. You can use a third-party service like Amazon S3 or Google Cloud Storage as an update server.
MōBrowser requires the update feed to be served over HTTPS — plain http:// feeds are rejected,
with the sole exception of http://localhost for local testing. Serving updates over HTTPS prevents a
network attacker from tampering with the packages in transit.
Once you set up the update server, remember its URL. You will need it in the next step.
Private update servers
The update server doesn’t have to be public. If it requires credentials, MōBrowser can send HTTP headers, such as an
Authorization token, with the update feed request and with every package download. This works with a CDN that
requires a token, a Cloudflare Access
service token, or an Azure SAS token.
For the built-in update flow, set app.updateServerHeaders in mobrowser.conf.json.
Reference secrets as ${VAR}: a production build replaces them with the values of the environment variables and
fails if a variable is not set, so the secret doesn’t have to be stored in your project:
{
  "app": {
    "updateServerUrl": "https://example.com/updates/",
    "updateServerHeaders": { "Authorization": "Bearer ${UPDATE_TOKEN}" }
  }
}
For a custom update flow, pass the headers to app.checkForUpdate(). This lets you use
a per-user token or credentials for a separate feed. The headers from mobrowser.conf.json are not sent by
checkForUpdate():
import { app } from '@mobrowser/api';

const result = await app.checkForUpdate('https://example.com/updates/', {
  headers: { Authorization: `Bearer ${token}` }
})
MōBrowser handles the headers as follows:
- The headers are sent only to the origin of the update server. Packages hosted on another origin are downloaded without them, and the headers are dropped when a redirect leads to another origin.
- A query string on the update server URL, such as an Azure SAS token, is kept on the feed request and on package downloads from the same origin.
- Header values and URL queries are removed from the update log and from error messages.
Host,User-Agent,Accept,Content-Length, and other headers that the HTTP client sets itself are reserved. Passing one of them tocheckForUpdate()throws aTypeError.
Important: The headers from mobrowser.conf.json ship inside the application bundle in plain text, and every
installation shares them. They prevent the update files from being downloaded by anyone who knows or guesses the URL,
but they don’t authenticate a user and can’t be revoked for a single installation. For per-user or revocable
credentials, for example a token the application receives after the user signs in, pass the headers to
app.checkForUpdate() instead.
Pre-signed package URLs
Storage services such as Amazon S3
and Google Cloud Storage sign each URL
separately, so a static header can’t authorize the package downloads. Instead, the update feed can point each package
at a pre-signed URL. Replace the FileName of a package in releases.<channel>.json with its full pre-signed URL:
the application downloads the package from that URL, saves it under its plain file name, and applies it as usual.
npm run pack writes plain file names to the feed, so add a step that signs the URLs to your release pipeline. Keep
the following in mind:
- Pre-signed URLs expire. S3 and Google Cloud Storage limit them to 7 days, so a feed written once at release time stops working. Generate the feed on request or re-sign it on a schedule.
- Only the feed request needs credentials. Protect it with a header as described above.
- When the feed is served over HTTPS, a package URL that uses plain HTTP is refused.
- The package signature covers the version and the SHA-256 hash of the package,
not its file name, so rewriting
FileNamedoesn’t weaken the verification.
Built-in update flow
Packaged macOS and Windows applications can provide a complete, user-initiated update flow without implementing it in application code. Set app.updateServerUrl in mobrowser.conf.json:
{
  "app": {
    "updateServerUrl": "https://app.com/updates"
  }
}
On macOS, MōBrowser adds Check for Updates… to the default application menu. On Windows, add the checkForUpdates role to a window menu:
import { Menu } from '@mobrowser/api';

win.setMenu(new Menu({
  items: [
    new Menu({
      label: 'Help',
      items: [
        'checkForUpdates'
      ]
    })
  ]
}))
The role is omitted when app.updateServerUrl is not set. When the user selects Check for Updates…, the application:
- Checks the configured update server.
- Shows a native message if the application is up to date, or asks whether to download an available update.
- Opens a progress dialog with the application icon, current status, and download progress.
- Changes the menu item to Restart to Update when the update is ready.
The item state stays synchronized across windows: Check for Updates… → Checking/Downloading… → Restart to Update.
The built-in flow never downloads or installs an update until the user initiates it. If your application needs background checks, custom dialogs, or another update policy, use the API described below instead.
Custom update flows
The automatic update functionality in MōBrowser is very flexible. You decide how exactly your application should check for updates, download and install them.
- You can check for updates in the background. When a new version of your application is available, you can download and install it automatically and ask the user to restart the application to apply the update.
- You can check for updates at the application startup, download and install them, and programmatically restart the application to make sure the user launches the latest version of your application.
- You can check for updates on demand when user selects “Check for Updates…” from the application menu or clicks a button in the Settings dialog. If a new version of your application is available, you can ask the user if they want to download and install it.
The following sections demonstrate how to check for updates, download and install them, retrieve update information, dismiss specific updates, and monitor installation progress.
Checking for updates
To check for updates, you need to know the update server URL that you should pass to the checkForUpdate() method as shown below:
import { app } from '@mobrowser/api';

const result = await app.checkForUpdate('https://app.com/updates')
The checkForUpdate() method returns a Promise that resolves to one of the following:
- An
AppUpdateobject if an update is available undefinedif no update is available- A
stringcontaining an error message if an error occurs while checking for updates (e.g., no internet connection, update server is unreachable, or update files are missing on the server)
import { app, AppUpdate } from '@mobrowser/api';

const result = await app.checkForUpdate('https://app.com/updates')
if (!result) {
  // No update is available or do nothing.
} else if (typeof result === 'string') {
  // An error occurred while checking for updates.
} else {
  const appUpdate: AppUpdate = result
  console.log('Update available: ', appUpdate.version)
}
Downloading and dismissing update
If an update is available, you can download it by calling the download() method of the AppUpdate object. To apply
the update, you need to restart or quit the application after it is downloaded:
const downloadResult = await appUpdate.download()
if (!downloadResult.success) {
  console.error(`Update download failed: ${downloadResult.error}`)
}
Or you can dismiss the update if you don’t want to download it:
appUpdate.dismiss()
Dismissing an update means that you don’t want to download it at this time. This could be because the user chose not to install it, the update contains known issues, or for any other reason you determine. When you check for updates again later, the dismissed update will still be available for download.
Note: Each AppUpdate instance can only be downloaded or dismissed once. Subsequent calls to dismiss() on the same instance are no-op. Calling download() after dismiss() doesn’t download the update. The returned promise resolves with success: false and an error that says the update is dismissed.
Download progress
Downloading an update may take some time depending on your internet connection speed and the size of the update.
You can get notifications about the download progress by subscribing to the progressChanged event:
appUpdate.on('progressChanged', (progress: number) => {
  console.log(`Downloading update: ${progress}%`)
})
const downloadResult = await appUpdate.download()
Restarting the application
After the update is downloaded, you can ask the user to restart the application to apply the update or wait for the user to restart the application manually.
const downloadResult = await appUpdate.download()
if (downloadResult.success) {
  const result = await app.showMessageDialog({
    parentWindow: win,
    title: `A new version ${appUpdate.version} is available!`,
    message: 'Restart to apply the update?',
    buttons: [
      { label: 'Restart', type: 'primary' },
      { label: 'Cancel', type: 'secondary' }
    ]
  })
  if (result.button.type === 'primary') {
    app.restart()
  }
}
To restart the application programmatically, use the application restart functionality.
Generating the update files
Now, you are ready to build your application with the automatic update functionality enabled and generate the update files. Run the following command:
npm run build && npm run pack
This command will build the application, package it into a native executable, create a native installer, and generate the update files you need to upload to the update server.
The automatic update functionality is supported on macOS and Windows only.
On Windows, you will find the update files in /build/dist/win-x64/pack/:
build/
|-- dist/
|   `-- win-x64/
|   |   `-- pack/
|   |   |   `-- <PACKAGE_ID>-<APP_VERSION>-full.nupkg
|   |   |   `-- releases.win.json
On macOS, you will find the update files in /build/dist/mac-<arch>/pack/. Building for Intel with --x64 produces a second, independent set:
build/
|-- dist/
|   `-- mac-arm64/
|   |   `-- pack/
|   |   |   `-- <BUNDLE_ID>-<APP_VERSION>-osx-full.nupkg
|   |   |   `-- releases.osx.json
|   `-- mac-x64/
|   |   `-- pack/
|   |   |   `-- <BUNDLE_ID>-<APP_VERSION>-osx-x64-full.nupkg
|   |   |   `-- releases.osx-x64.json
Each architecture is packed into its own Velopack channel, which appears both in the package names and in the name of the release index:
| Build | Channel | Release index |
|---|---|---|
| Apple Silicon (default) | osx | releases.osx.json |
Intel (--x64) | osx-x64 | releases.osx-x64.json |
Note: osx means Apple Silicon, not macOS in general. It is the name MōBrowser used before Intel builds were supported, and it is kept unchanged so that already-installed applications keep receiving updates. Intel is the build that carries the explicit -x64.
You can upload both channels to the same directory on your update server and keep a single update URL: an installed application only ever reads the index of the channel it was built with. For the same reason, --releases can point at one shared directory for both architectures.
Delta updates
You will most likely want to use the delta updates, which allow your users to download only the changes between versions instead of the entire application. It’s significantly faster to download and install the delta update than the full update.
npm run pack keeps packages from earlier versions in build/dist/<platform>-<arch>/pack. When you increment app.version, build, and pack the application again, MōBrowser uses the existing full packages to generate the delta packages automatically. The generated releases.<channel>.json describes every version available in the directory.
npm run build
npm run pack
Keep the earlier packages in this directory for as long as you want users of those versions to receive a delta update.
If your previous release packages are stored elsewhere, you can still provide their directory explicitly:
npm run pack -- --releases=/path/to/previous-releases
Packaging refuses to overwrite an existing version or installer. To recreate the current version’s artifacts, pass --force:
npm run pack -- --force
The command replaces only the artifacts it produces for the current version and preserves packages for other versions.
Uploading the update files
You need to manually upload the following files to the update server:
*-full.nupkg— a full NuGet package for the new version of your application. This package is used when the user installs the update from scratch or when no previous version is available locally.*-delta.nupkg— a delta NuGet package that contains only the differences between the previous and the new version of your application. This package is significantly smaller than the full package and allows faster updates. Delta packages are generated automatically when the pack directory contains compatible full.nupkgfiles from previous releases.releases.<channel>.json— this file contains the information about the available updates for one channel (win,osx, orosx-x64). It’s a JSON file with the list of the available updates, including both full and delta packages. You need to update this file on your update server every time you release a new version of your application. This file should have the same location as NuGet packages on your update server.
Make sure your desktop application can download the uploaded files: either make them publicly accessible, or configure the credentials as described in Private update servers.
Protecting the update files
Auto-updates are also an attack surface: your app installs whatever the feed serves, so it’s only as trustworthy as that feed. MōBrowser locks this down, so that users can only install updates from your update server.
Why protection matters
The application updates used to be trusted on nothing more than a checksum from the same manifest that delivered them. Whoever controls the feed controls both the package and the checksum it’s checked against. A compromised bucket or a man-in-the-middle over plain HTTP could push a malicious “update” to all your users, and nothing would catch it.
How MōBrowser protects the update files
These things guard the pipeline:
- HTTPS-only feed. Feeds must be served over HTTPS (except
http://localhostfor local dev), so nobody can tamper with packages in transit. - SHA-256 verification at apply time. Packages are checked with SHA-256 on the exact bytes being installed to detect corruption/tampering and ensure integrity of the package being applied.
- Downgrade protection. An update whose version is older than the one installed is refused, and the version is bound into the signature so it can’t be relabeled — an attacker can’t roll you back to an older, known-vulnerable release.
- Two trust anchors you control. An update installs only if it passes one of the two checks below.
- it carries a valid Ed25519 signature, or
- it is code-signed with the same identity as the installed app.
If neither check passes, the update is rejected.
The two trust anchors
Ed25519 package signature. You sign every release with a private key. The matching public key ships inside the installed app, and the app checks each update against it. No private key means no valid signature, so an attacker can’t forge one the app will accept.
Code-signing with the same identity. The update has to be code-signed with the same identity as the installed app. MōBrowser reads that identity from the installed app and checks the update against it:
- On Windows, the update needs a valid Authenticode signature from a trusted CA whose certificate subject matches the installed app.
- On macOS, the update must be Developer ID-signed with the same Team ID.
Why two? They fail independently, so you can recover from losing either one:
- The signature gives you strong, publisher-only authenticity.
- The identity anchor means losing or rotating your Ed25519 key won’t strand your users — they still accept an update code-signed by the same publisher, then pick up the new key from it.
- The catch: an attacker only has to beat one anchor, so you’re only as strong as the weaker one. That’s fine here — your code-signing identity already signs your installer, so it’s not a new secret to guard.
A code-signed app is also what secures delta updates: each delta is itself Ed25519-signed and verified as it downloads, but the auto-update mechanism reassembles and re-compresses the full package locally, so the rebuilt package no longer matches the signed release’s hash — the update that actually gets applied is therefore authenticated by the code-signing identity anchor rather than by the Ed25519 signature.
Enabling package signing
You never handle key material directly — the MōBrowser CLI manages the signing key for you.
Generate the key once per application (or per publisher):
npm run mobrowser signkey
This generates the signing key if none exists and prints its public key. It is idempotent —
running it again won’t overwrite an existing key. The private key is stored in your operating system’s
secret store (macOS Keychain / Windows Credential Manager), falling back to
~/.mobrowser/signing.key.
The signkey command supports the following forms:
| Command | What it does |
|---|---|
npm run mobrowser signkey | Generates the private key if absent, then prints the public key. Idempotent. |
npm run mobrowser signkey --print | Prints the public key of the existing key. Errors if no key exists. |
npm run mobrowser signkey --export <file> | Writes the private key to <file> (for use as a CI secret). |
Once a signing key is available, npm run pack signs the update packages automatically — no extra
flags are needed, and the public key is embedded in the build. If no key is found, packing prints a
non-blocking warning that your auto-update packages will be unsigned, and continues.
Signing in CI/CD
The same key has to sign every release, so it needs to persist across builds. Keep it as a single CI/CD secret instead of generating one per build.
Export the private key once, locally:
npm run mobrowser signkey --export signkey.txtStore the contents of
signkey.txtas a masked/secret CI variable namedCI_MOBROWSER_AUTOUPDATE_SIGNING_KEY, then delete the local file.In the CI job that runs your build/pack, make sure that variable is present in the environment. MōBrowser’s packer inherits it and signs every update package automatically, embedding the public key. No extra flags are required.
Wire your code-signing credentials into the same job so that shipped artifacts also carry the identity anchor. See Signing Application.
Key management and rotation
- Keep the private signing key secret. If you lose it, code-signed apps can still recover: ship updates signed by the code-signing identity anchor, and clients pick up a new signing key from the first one.
- When you need to rotate, change only one anchor at a time:
- Rotate the signing key: ship a release signed with the new key but code-signed with your existing identity. Clients that don’t yet trust the new key accept the update via the identity anchor, then adopt the new key.
- Change the code-signing identity (e.g. a new Team ID): ship a release with the new identity but signed with your existing key. Clients verify via the signature and adopt the new identity.
Important: Never change both anchors in the same release. Clients could then validate neither and would need to install an application again with a new installer to recover.