Browser
This guide describes how to create, use, and close Browser.
Refer to the Architecture guide for more information on DotNetBrowser architecture, its main components, and their interaction.
Creating a browser
To create a new IBrowser instance, use the IProfile.CreateBrowser() method. For example:
IBrowser browser = engine.Profiles.Default.CreateBrowser();
Dim browser As IBrowser = engine.Profiles.Default.CreateBrowser()
If you use IEngine.CreateBrowser() method then the browser is created under the default profile. However, this approach is obsolete, and it’s recommended to use the corresponding profile instance instead.
This method performs the following actions:
- Creates a new
IBrowserinstance. - Loads the
about:blankweb page in it and waits until the web page is completely loaded.
Disposing a browser
The IBrowser instance runs in the Chromium Main process and allocates memory and system resources to be released. When an IBrowser instance is no longer needed, dispose it using the IBrowser.Dispose() method. As a result, all the allocated memory and system resources are released. See the code sample below:
IBrowser browser = engine.Profiles.Default.CreateBrowser();
// ...
browser.Dispose();
Dim browser As IBrowser = engine.Profiles.Default.CreateBrowser()
' ...
browser.Dispose()
An attempt to use an already disposed IBrowser instance leads to the ObjectDisposedException.
The IBrowser instance is disposed automatically in the following cases:
- When its parent
IEngineinstance is disposed or crashed unexpectedly. - When this
IBrowserinstance is a pop-up that is closed from JavaScript usingwindow.close().
Use the Disposed event to be notified when the IBrowser instance is disposed. See the code sample below:
browser.Disposed += (sender, event => {});
AddHandler browser.Disposed,  Sub(s,e)
End Sub
Use the IsDisposed property to check whether IBrowser is already disposed:
bool disposed = browser.IsDisposed;
Dim disposed As Boolean = browser.IsDisposed
Browser size
By default, IBrowser size is empty. If you want to work with DOM or Find Text on a web page, set the browser size first.
To update the size of the IBrowser, please use its Size property. See the code sample below:
browser.Size = new Size(800, 600);
browser.Size = New Size(800, 600)
This method notifies Chromium that the size of the IBrowser instance has been changed. Chromium will update the DOM layout of the loaded web page and repaint its content asynchronously. It might take some time for the web page to be repainted after the property is set.
Browser settings
It is possible to customize the browser settings through the IBrowser.Settings property. The browser settings can be used to disable images, plugins or JavaScript in the browser, hide scrollbars, disable application cache. See the code sample below:
// Disable all scripts.
browser.Settings.JavaScriptEnabled = false;
' Disable all scripts.
browser.Settings.JavaScriptEnabled = False
Specifying WebRTC IP Handling Policy
DotNetBrowser allows to customize WebRTC IP handling policy. These are WebRTC policies available in DotNetBrowser:
Default- default Chromium behavior. When this policy is set, WebRTC can enumerate all interfaces and bind them to discover public interfaces.DefaultPublicInterfacesOnly- tells the browser to send WebRTC traffic using the default public network adapter. This will be the VPN adapter for system-VPN users. WebRTC must use only the default route used by http.DefaultPublicAndPrivateInterfaces- same asDefaultPublicInterfacesOnlyexcept it allows WebRTC traffic through the default private interface to your local network as well.DisableNonProxiedUdp- disables non-proxied UDP and forces proxy. This policy forces the use of a proxy and only allows WebRTC traffic over UDP proxies. It effectively disables WebRTC communication for most users depending on UDP proxy usage.
The following sample code demonstrates how to configure the WebRTC IP handling policy for a Browser instance:
browser.Settings.WebRtcIpHandlingPolicy =
    WebRtcIpHandlingPolicy.DisableNonProxiedUdp;
browser.Settings.WebRtcIpHandlingPolicy =
    WebRtcIpHandlingPolicy.DisableNonProxiedUdp
Dark mode
You can force the preffered color scheme on the webpage as follows:
// Forces dark mode.
browser.Settings.PreferredColorScheme = PreferredColorScheme.Dark;
// Forces light mode.
browser.Settings.PreferredColorScheme = PreferredColorScheme.Light;
' Forces dark mode.
browser.Settings.PreferredColorScheme = PreferredColorScheme.Dark
' Forces light mode.
browser.Settings.PreferredColorScheme = PreferredColorScheme.Light
The above settings will only be aplied on the websites which respect the prefers-color-scheme media query.
User Agent
You can override the default User Agent string and configure IBrowser to use a custom string. See the code sample below:
browser.UserAgent = "<user-agent>";
browser.UserAgent = "<user-agent>"
The same property can be used to get the current user agent string:
string userAgent = browser.UserAgent;
Dim userAgent As String = browser.UserAgent
User-Agent Client Hints
You can override the default User-Agent Client Hints string and configure IBrowser to use a custom set of values. See the code sample below:
UserAgentMetadata userAgentMetadata = new UserAgentMetadata.Builder
{
    Platform = "Windows",
    FullVersion = "140.0.7339.81",
    PlatformVersion = "10.0.0",
    BrandVersionList =
    {
        new UserAgentBrandVersion.Builder
            { Brand = "Chromium", Version = "140" }.Build()
    },
    BrandFullVersionList =
    {
        new UserAgentBrandVersion.Builder
            { Brand = "Chromium", Version = "140.0.7339.81" }.Build()
    },
}.Build();

browser.UserAgentMetadata = userAgentMetadata;
Dim builder = New UserAgentMetadata.Builder With {
        .Platform = "Windows",
        .FullVersion = "140.0.7339.81",
        .PlatformVersion = "10.0.0"
        }
builder.BrandVersionList.Add(
    New UserAgentBrandVersion.Builder With {
            .Brand = "Chromium",
            .Version = "140"
            }.Build())
builder.BrandFullVersionList.Add(
    New UserAgentBrandVersion.Builder With {
            .Brand = "Chromium",
            .Version = "140.0.7339.81"
            }.Build())

Dim userAgentMetadata = builder.Build()

browser.UserAgentMetadata = userAgentMetadata
Remote debugging URL
To get the remote debugging URL for a web page loaded in a particular IBrowser instance, use the following approach:
string url = browser.DevTools.RemoteDebuggingUrl;
Dim url As String = browser.DevTools.RemoteDebuggingUrl
This approach returns a valid URL only if the IEngine is configured with the Remote Debugging Port. Otherwise, the property value is null.
DevTools
To show DevTools window programmatically without configuring remote debugging port, use the following code:
browser.DevTools.Show();
browser.DevTools.Show()
View page source
You can view source of the loaded web page or frame using the following method:
browser.MainFrame?.ViewSource();
browser.MainFrame?.ViewSource()
The code above tells Chromium to create and open a popup window with the HTML source of the main frame.
Mouse, keyboard, and touch events
DotNetBrowser allows to intercept the mouse, keyboard, and touch events before they are sent to the web page using the following handlers:
IBrowser.Mouse.Entered.HandlerIBrowser.Mouse.Exited.HandlerIBrowser.Mouse.Pressed.HandlerIBrowser.Mouse.Released.HandlerIBrowser.Mouse.Moved.HandlerIBrowser.Mouse.WheelMoved.HandlerIBrowser.Keyboard.KeyPressed.HandlerIBrowser.Keyboard.KeyTyped.HandlerIBrowser.Keyboard.KeyReleased.HandlerIBrowser.Touch.Started.HandlerIBrowser.Touch.Canceled.HandlerIBrowser.Touch.Ended.HandlerIBrowser.Touch.Moved.Handler
The following code sample demonstrates how to suppress mouse wheel events:
browser.Mouse.WheelMoved.Handler =
    new Handler<IMouseWheelMovedEventArgs, InputEventResponse>(e =>
    {
        return InputEventResponse.Suppress;
    });
browser.Mouse.WheelMoved.Handler =
    New Handler(Of IMouseWheelMovedEventArgs, InputEventResponse)(Function(e)
        Return InputEventResponse.Suppress
    End Function)
You can use these handlers to get the notifications about the mouse and keyboard events to implement hotkeys in your application. You can also suppress the default shortcuts such as Ctrl+C. See the code sample below:
browser.Keyboard.KeyPressed.Handler =
    new Handler<IKeyPressedEventArgs, InputEventResponse>(e =>
    {
        bool keyCodeC = e.VirtualKey == KeyCode.VkC;
        bool controlDown = e.Modifiers.ControlDown;
        if (controlDown && keyCodeC)
        {
            return InputEventResponse.Suppress;
        }
        return InputEventResponse.Proceed;
    });
browser.Keyboard.KeyPressed.Handler =
    New Handler(Of IKeyPressedEventArgs, InputEventResponse)(Function(e)
        Dim keyCodeC As Boolean = e.VirtualKey = KeyCode.VkC
        Dim controlDown As Boolean = e.Modifiers.ControlDown
        If controlDown AndAlso keyCodeC Then
            Return InputEventResponse.Suppress
        End If
        Return InputEventResponse.Proceed
    End Function)
Simulating user input
DotNetBrowser allows to simulate mouse and keyboard input. Simulation is available in both off-screen and hardware-accelerated rendering modes for WPF, Windows Forms, and Avalonia UI.
You can simulate input by raising mouse and keyboard events. For example, here is how to simulate typing:
private static void SimulateKey(IKeyboard keyboard, KeyCode key, string keyChar,
                                KeyModifiers modifiers = null)
{
    modifiers = modifiers ?? new KeyModifiers();
    KeyPressedEventArgs keyDownEventArgs = new KeyPressedEventArgs
    {
        KeyChar = keyChar,
        VirtualKey = key,
        Modifiers = modifiers
    };

    KeyTypedEventArgs keyPressEventArgs = new KeyTypedEventArgs
    {
        KeyChar = keyChar,
        VirtualKey = key,
        Modifiers = modifiers
    };
    KeyReleasedEventArgs keyUpEventArgs = new KeyReleasedEventArgs
    {
        VirtualKey = key,
        Modifiers = modifiers
    };

    keyboard.KeyPressed.Raise(keyDownEventArgs);
    keyboard.KeyTyped.Raise(keyPressEventArgs);
    keyboard.KeyReleased.Raise(keyUpEventArgs);
}
Private Shared Sub SimulateKey(keyboard As IKeyboard, key As KeyCode, keyChar As String,
                               Optional modifiers As KeyModifiers = Nothing)
    modifiers = If(modifiers, New KeyModifiers())
    Dim keyPressedEventArgs = New KeyPressedEventArgs With {
        .KeyChar = keyChar,
        .VirtualKey = key,
        .Modifiers = modifiers
    }

    Dim keyTypedEventArgs = New KeyTypedEventArgs With {
        .KeyChar = keyChar,
        .VirtualKey = key,
        .Modifiers = modifiers
    }

    Dim keyReleasedEventArgs = New KeyReleasedEventArgs With {
        .VirtualKey = key,
        .Modifiers = modifiers
    }

    keyboard.KeyPressed.Raise(keyPressedEventArgs)
    keyboard.KeyTyped.Raise(keyTypedEventArgs)
    keyboard.KeyReleased.Raise(keyReleasedEventArgs)
End Sub
IKeyboard keyboard = browser.Keyboard;
SimulateKey(keyboard, KeyCode.VkH, "H");
SimulateKey(keyboard, KeyCode.VkE, "e");
SimulateKey(keyboard, KeyCode.VkL, "l");
SimulateKey(keyboard, KeyCode.VkL, "l");
SimulateKey(keyboard, KeyCode.VkO, "o");
SimulateKey(keyboard, KeyCode.Space, " ");
// Simulate input of some non-letter characters.
SimulateKey(keyboard, KeyCode.Vk5, "%", new KeyModifiers {ShiftDown = true});
SimulateKey(keyboard, KeyCode.Vk2, "@", new KeyModifiers {ShiftDown = true});
Dim keyboard As IKeyboard = browser.Keyboard
SimulateKey(keyboard, KeyCode.VkH, "H")
SimulateKey(keyboard, KeyCode.VkE, "e")
SimulateKey(keyboard, KeyCode.VkL, "l")
SimulateKey(keyboard, KeyCode.VkL, "l")
SimulateKey(keyboard, KeyCode.VkO, "o")
SimulateKey(keyboard, KeyCode.Space, " ")
' Simulate input of some non-letter characters.
SimulateKey(keyboard, KeyCode.Vk5, "%",
            New KeyModifiers() With {.ShiftDown = True})
SimulateKey(keyboard, KeyCode.Vk2, "@",
            New KeyModifiers() With {.ShiftDown = True})
The complete examples are available in our repository:
WinForms (C#, VB.NET)
WPF (C#, VB.NET)
Avalonia UI (C#)
You can simulate the mouse click by raising IMouse.Moved, IMouse.Pressed, and IMouse.Released events in a sequence. For example, here is how to simulate a single click:
IMouse mouse = browser.Mouse;
MouseButton mouseButton = MouseButton.Left;
Point location = new Point(10, 10);

MouseMovedEventArgs moveEvent = new MouseMovedEventArgs
{
    Location = location
};

MousePressedEventArgs pressEvent = new MousePressedEventArgs
{
    Location = location,
    Button = mouseButton,
    ClickCount = 1
};

MouseReleasedEventArgs releaseEvent = new MouseReleasedEventArgs
{
    Button = mouseButton,
    ClickCount = 1,
    Location = location
};

mouse.Moved.Raise(moveEvent);
Thread.Sleep(200);
mouse.Pressed.Raise(pressEvent);
Thread.Sleep(200);
mouse.Released.Raise(releaseEvent);
Dim mouse As IMouse = browser.Mouse
Dim mouseButton As MouseButton = MouseButton.Left
Dim location As New Point(10, 10)

Dim moveEvent As New MouseMovedEventArgs With {.Location = location}

Dim pressEvent As New MousePressedEventArgs With {
    .Location = location,
    .Button = mouseButton,
    .ClickCount = 1
}

Dim releaseEvent As New MouseReleasedEventArgs With {
    .Button = mouseButton,
    .ClickCount = 1,
    .Location = location
}

mouse.Moved.Raise(moveEvent)
Thread.Sleep(200)
mouse.Pressed.Raise(pressEvent)
Thread.Sleep(200)
mouse.Released.Raise(releaseEvent)
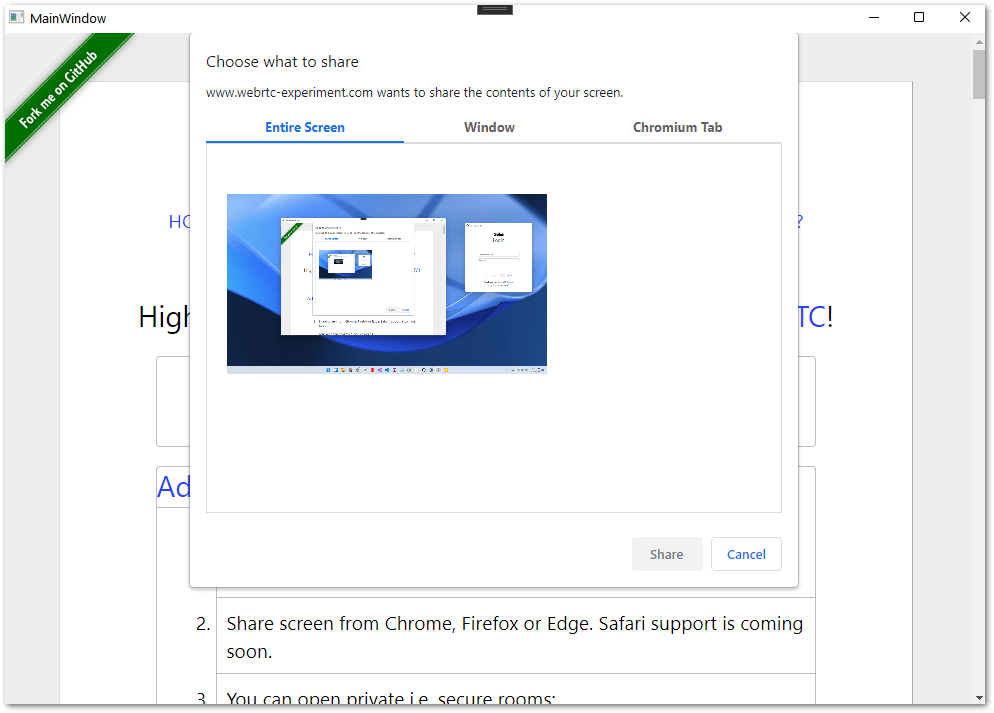
WebRTC screen sharing
Chromium provides built-in functionality that allows sharing entire screen, application window or a web page. By default, DotNetBrowser displays a standard dialog where user can select capture source:
If you do not want to display this dialog, it is possible handle the requests and select the capture source programmatically. For example:
browser.Capture.StartSessionHandler =
    new Handler<StartSessionParameters, StartSessionResponse>(p =>
{
    // Tell the browser instance to start a new capture session and specify the
    // capture source.
    return StartSessionResponse.SelectSource(p.Sources.Screens.FirstOrDefault(),
                                             AudioMode.Ignore);
});
browser.Capture.StartSessionHandler =
    New Handler(Of StartSessionParameters, StartSessionResponse)(Function(p)
        ' Tell the browser instance to start a new capture session and specify the
        ' capture source.
    Return StartSessionResponse.SelectSource(p.Sources.Screens.FirstOrDefault(),
                                            AudioMode.Ignore)
End Function)
To programmatically stop the session, use the following approach:
// Get all capture sessions of the current browser.
IReadOnlyList<ISession> sessions = browser.Capture.Sessions;
foreach (ISession session in sessions)
{
    string sourceName = session.Source.Name;
    bool isActive = session.IsActive;

    // Stop the session.
    session.Stop();
}
' Get all capture sessions of the current browser.
Dim sessions As IReadOnlyList(Of ISession) = browser.Capture.Sessions
For Each session As ISession In sessions
    Dim sourceName As String = session.Source.Name
    Dim isActive As Boolean = session.IsActive

    ' Stop the session.
    session.Stop()
Next
You can also suppress screen sharing requests and standard dialog from being shown. Here is the example:
browser.Capture.StartSessionHandler =
    new Handler<StartSessionParameters, StartSessionResponse>(p =>
{
    // Cancel the sharing action.
    return StartSessionResponse.Cancel();
});
browser.Capture.StartSessionHandler =
    New Handler(Of StartSessionParameters, StartSessionResponse)(Function(p)
        ' Cancel the sharing action.
    Return StartSessionResponse.Cancel()
End Function)
Drag and Drop
Since DotNetBrowser 2.3, it is possible to intercept the drag enter and drop events on the web page in the hardware-accelerated rendering mode. For this purpose, you need to use the EnterDragHandler and DropHandler. For example:
browser.DragAndDrop.EnterDragHandler =
    new Handler<EnterDragParameters>(OnDragEnter);
browser.DragAndDrop.DropHandler = new Handler<DropParameters>(OnDrop);
browser.DragAndDrop.EnterDragHandler =
    New Handler(Of EnterDragParameters)(AddressOf OnDragEnter)
browser.DragAndDrop.DropHandler = New Handler(Of DropParameters)(AddressOf OnDrop)
private void OnDragEnter(EnterDragParameters arg)
{
    if (arg.Event.DropData != null)
    {
        //Write file names to debug output.
        foreach (IFileValue file in arg.Event.DropData.Files)
        {
            Debug.WriteLine($"OnDragEnter: File = {file?.FileName}");
        }
    }
}

private void OnDrop(DropParameters arg)
{
    if (arg.Event.DropData != null)
    {
        //Write file names to debug output.
        foreach (IFileValue file in arg.Event.DropData.Files)
        {
            Debug.WriteLine($"OnDrop: File = {file?.FileName}");
        }
    }
}
Private Sub OnDragEnter(arg As EnterDragParameters)
    If arg.Event.DropData IsNot Nothing Then
        ' Write file names to debug output.
        For Each file As IFileValue In arg.Event.DropData.Files
            Debug.WriteLine($"OnDragEnter: File = {file?.FileName}")
        Next file
    End If
End Sub

Private Sub OnDrop(arg As DropParameters)
    If arg.Event.DropData IsNot Nothing Then
        ' Write file names to debug output.
        For Each file As IFileValue In arg.Event.DropData.Files
            Debug.WriteLine($"OnDrop: File = {file?.FileName}")
        Next file
    End If
End Sub
In .NET Framework, it is also possible to work with the IDataObject instance in the scope of these handlers to receive and process the Windows-specific representation of the dragged and dropped data. This functionality becomes available when the --enable-com-in-drag-drop Chromium switch is specified. For example:
private void OnDragEnter(EnterDragParameters arg)
{
    LogData(arg.Event.DropData, nameof(OnDragEnter));
    Debug.WriteLine($"Data is null? {(arg.Event.DataObject == null)}");

    System.Runtime.InteropServices.ComTypes.IDataObject dataObject =
        arg.Event.DataObject;
    if (dataObject != null)
    {
        // Process data in IDataObject
        ExtractData(nameof(OnDragEnter), new DataObject(dataObject));
    }
}

private void OnDrop(DropParameters arg)
{
    LogData(arg.Event.DropData, nameof(OnDrop));
    Debug.WriteLine($"Data is null? {(arg.Event.DataObject == null)}");

    System.Runtime.InteropServices.ComTypes.IDataObject dataObject =
        arg.Event.DataObject;
    if (dataObject != null)
    {
        // Process data in IDataObject
        ExtractData(nameof(OnDrop), new DataObject(dataObject));
    }
}
Private Sub OnDragEnter(arg As EnterDragParameters)
    LogData(arg.Event.DropData, NameOf(OnDragEnter))
    Debug.WriteLine($"Data is null? {(arg.Event.DataObject Is Nothing)}")
    Dim dataObject As IDataObject = arg.Event.DataObject

    If dataObject IsNot Nothing Then
        ' Process data in IDataObject.
        ExtractData(NameOf(OnDragEnter), New DataObject(dataObject))
    End If
End Sub

Private Sub OnDrop(arg As DropParameters)
    LogData(arg.Event.DropData, NameOf(OnDrop))
    Debug.WriteLine($"Data is null? {(arg.Event.DataObject Is Nothing)}")
    Dim dataObject As IDataObject = arg.Event.DataObject

    If dataObject IsNot Nothing Then
        ' Process data in IDataObject.
        ExtractData(NameOf(OnDrop), New DataObject(dataObject))
    End If
End Sub
For full example, navigate to our repository: C#, VB.NET.
In the off-screen rendering mode, drag and drop is not supported and is disabled completely.
Title events
TitleChanged event indicates that the title of a document in the main frame has been changed.
To get notifications when a document’s title change, use the TitleChanged listener as shown in the code sample below:
browser.TitleChanged += delegate (object sender, TitleChangedEventArgs e)
{
    string mainDocumentTitle = e.Title;
};
AddHandler browser.TitleChanged, Sub(sender As Object, e As TitleChangedEventArgs)
    Dim mainDocumentTitle As String = e.Title
End Sub
Status events
When the user moves the cursor over a link, Chromium engine displays its URL in the status bar. JavaScript code can change the text in the status bar programmatically using the window.statusproperty as well. The DotNetBrowser API provides functionality for getting notifications about status bar text changes.
StatusChanged event indicates that the status bar text has been changed.
The code sample below demonstrates how to use this functionality:
browser.StatusChanged += delegate(object sender, StatusChangedEventArgs e)
{
    string statusText = e.Text;
};
AddHandler browser.StatusChanged, Sub(sender As Object, e As StatusChangedEventArgs)
    Dim statusText As String = e.Text
End Sub
Render process termination event
Each IBrowser instance is bound to a separate native process where the web page is rendered. By default, Chromium creates a render process for each instance of a website the user visits. This ensures that pages from different websites are rendered independently, and separate visits to the same website are also isolated from each other. Thus, failures (for example, renderer crashes) or heavy resource usage in one instance of a site does not affect the rest of the browser.
Sometimes this process can terminate unexpectedly. To receive notifications about render process termination, you can subscribe to the IBrowser.RenderProcessTerminated event. The RenderProcessTerminatedEventArgs.ExitCode value can be used to determine whether this is an expected process termination or a failure.
When you receive a notification about the unexpected render process termination, you can display a “sad” icon like Google Chrome does, for example, to inform the user about this particular instance crash.
If you refresh or load the same or another URL after the crash, the rendering process and the IBrowser instance is restored:
browser.RenderProcessTerminated += (sender, e) =>
{
    int exitCode = e.ExitCode;
    if (exitCode != 0)
    {
        // Render process terminated unexpectedly.
    }
};
AddHandler browser.RenderProcessTerminated, Sub(sender, e)
    Dim exitCode As Integer = e.ExitCode
    If exitCode <> 0 Then
        ' Render process terminated unexpectedly.
    End If
End Sub